Local Docker Development Environment
Introduction
There are many options out there for local development for websites, but each one has limitations ranging from not flexible enough to overly complex. The type of projects, or scale of the projects, will help you determine what solution you need.
On nearly every project, I'm utilizing multiple technologies that sometimes are best to run in separate servers (containers):
- Laravel (PHP Backend)
- MySQL (Relational Data)
- MongoDB (Non-Relational Data)
There are several great options for dev environments using this tech stack:
- Laravel Herd (Up and running fast!)
- Laravel Sail (low-config docker setup)
- Custom Docker
What I want to describe today is the custom docker setup I was introduced to a few years back, that still works great today. It allows for custom local domains, multiple 'servers' (aka containers), multiple databases or a centralized database across multiple projects, and more.
You can kind of view Docker as a localized data center, with the ability to 'spin up' pretty much any server you might need: Web server, db server, caching server, load balancer.. you name it.
For this post, we will assume the following conditions are needed:
- A Centralized DB accessible from multiple containers (E.G. You have multiple laravel sites on different containers needing the same database).
- A reverse-proxy setup to allow for local domains to run and easily access multiple sites/services at once.
A couple final things to note to keep in mind moving forward:
- This is not a guide that covers every minute detail. It is more of an introduction to the structure, and I highly recommend familiarizing yourself with the Docker documentation, traefik documentation, and others that you might need to get this completed and make further changes to let it better suit your needs. Let's get started!
- The formatting of the code in this article is not correct for some file types. Visit the linked github to get the formatted versions (E.G. for the .yml files). You can find all the referenced files here: github.com/JoshuaBedford/example-docker-environment
Creating the docker networks
The defined external networks in these config files must be manually created via docker and are not automatically created by the files we cover. To keep this guide short, please refer to the docker documentation here (https://docs.docker.com/engine/reference/commandline/network_create/) to create the necessary networks (namely, the mysqlnet network that shares the mysql central database between containers and the proxynet network that shares the traefik routing).
Docker Common
The first container we will configure will be dual purposed: it will host our centralized database and our primary Traefik configuration for the proxy server. This is the common thread that links and enabled all of our future containers.
First, we need to create the local directory to host the files. I placed mine in ~/Sites/docker-common. It can be called anything you want, just whatever makes sense to you. See the image below for what the directory structure will look like when we are finished.
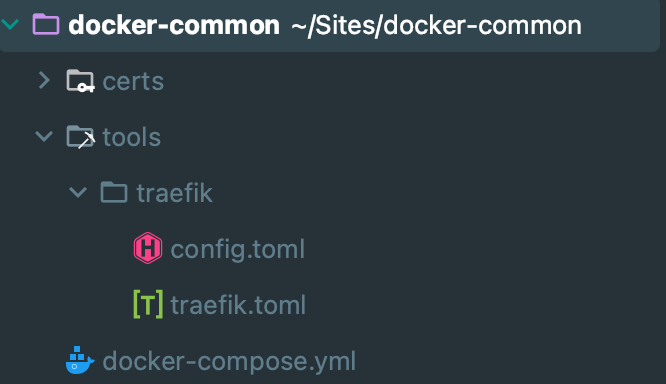 Let's create the structure we saw above. Create the certs and tools directories. Within tools, create the traefik directory. With the root (~/Sites/docker-common in my case), create the docker-compose.yml file. This is the config file that docker uses to create the container.
docker-compose.yml
services:
traefik:
image: traefik:v2.0
command:
- --api.insecure=true
- --providers.docker
- --entrypoints.web.address=:80
- --entrypoints.websecure.address=:443
networks:
- proxynet
ports:
- "80:80"
- "8080:8080"
- "443:443"
volumes:
- ./certs:/etc/certs
- ./tools/traefik/traefik.toml:/etc/traefik/traefik.toml
- ./tools/traefik/config.toml:/etc/traefik/traefik.config.toml
- /var/run/docker.sock:/var/run/docker.sock
db:
image: mysql:5.7
environment:
MYSQL_ROOT_PASSWORD: secret
MYSQL_USER: dbuser
MYSQL_PASSWORD: secret
networks:
- mysqlnet
volumes:
- dbdata:/var/lib/mysql
ports:
- 3306:3306
proxynet:
external: true
name: proxy-net
mysqlnet:
external: true
name: mysql-net
dbdata:
driver: local
Click here to get the copy/paste version.
tools > traefik > config.toml
Generate a local certificate (I utilized mkcert) to enable https on your local dev sites, and place it in ~/Sites/docker-common/certs. We will then access it in the config file at /etc/certs and place the cert and key files in their correct place:
certFile = "/etc/certs/yourkeyname-cert.pem"
keyFile = "/etc/certs/yourkeyname-key.pem"
tools > traefik > traefik.toml
Now we will configure Traefik itself. This is the tool where the magic happens! It will handle the localhost domains / ports for you so you don't have to worry about running multiple sites at once.
sendAnonymousUsage = false
[log]
# If something goes wrong, changing this to `DEBUG` might help you finding
# out what happens.
level = "INFO" #DEBUG, INFO, WARN, ERROR, FATAL, PANIC
format = "common"
[entryPoints]
[entryPoints.http]
address = ":80"
[entryPoints.https]
address = ":443"
[providers]
# This is how you tell traefik that it has to get the dynamic config from a config file
# Note that the path is the path to the file inside Docker, not insider your machine!
# If you want do use Docker itself for this check traefik docs!
[providers.docker]
[providers.file]
filename = "etc/traefik/traefik.config.toml"
[api]
# With this you enable the web UI
insecure = true
dashboard = true
Yep, it's that easy! Traefik has very in-depth documentation, so your best bet for learning more about it is to visit their docs: https://doc.traefik.io/traefik/
Now, when you start your docker-common container, it will launch the container that runs traefik as well as your database.
Project X
Now, you just need to create a container for your actual project. For this example, we will create a directory at ~/Sites/project-x and place a docker-compose.yml file inside. For this project, we will support:
- Connecting to the centralized database.
- Hosting a local MongoDB server (though this could be setup in docker-common).
- Accessing Project X at a custom localhost domain.
First, we need to setup the docker config file:
services:
web:
image: nginx:alpine
ports:
- 80
- 443
volumes:
- .:/var/www/html
- ./docker/nginx/default:/etc/nginx/conf.d/default.conf
networks:
- proxynet
- appnet
labels:
- "traefik.http.routers.xsolutions.rule=(Host(`projectx.localhost`))"
- "traefik.http.routers.xsolutions-https.rule=(Host(`projectx.localhost`))"
- "traefik.http.routers.xsolutions-https.entrypoints=https"
- "traefik.http.routers.xsolutions-https.tls=true"
- "traefik.http.routers.xsolutions-https.tls.domains[0].main=projectx.localhost"
- "traefik.docker.network=proxy-net"
php:
build:
context: ./docker/php
dockerfile: Dockerfile
image: xsolutions/projectx-app:latest
volumes:
- .:/var/www/html
networks:
- appnet
- mysqlnet
composer:
image: composer:latest
container_name: composer
volumes:
- .:/var/www/html
working_dir: /var/www/html
networks:
- appnet
- mysqlnet
mongo:
image: mongo
restart: always
environment:
MONGO_INITDB_ROOT_USERNAME: projectx
MONGO_INITDB_ROOT_PASSWORD: password
MONGO_INITDB_DATABASE: projectx
ports:
- 27019:27017
networks:
- appnet
volumes:
- mongodata:/data/db
redis:
image: redis:alpine
networks:
- appnet
testdb:
image: mysql:5.7
ports:
- "33065:3306"
environment:
MYSQL_ROOT_PASSWORD: secret
MYSQL_USER: dbuser
MYSQL_PASSWORD: secret
MYSQL_DATABASE: projectx_test
MYSQL_ALLOW_EMPTY_PASSWORD: 'yes'
networks:
- appnet
volumes:
- testdb:/var/lib/mysql
networks:
appnet:
driver: bridge
proxynet:
external: true
name: proxy-net
mysqlnet:
external: true
name: mysql-net
volumes:
testdb:
driver: local
mongodata:
driver: local
Click here to get the copy/paste version.
Additional Config
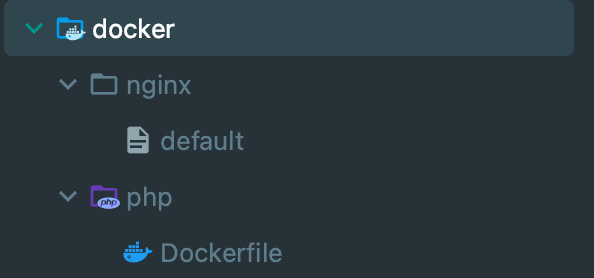
Next, we can setup some config files for it to use while building to enable extra extensions. We will place them in the ~/Sites/project-x/docker directory. You can use different config files to tell docker how you want different areas configured as it creates those services.
PHP Config
Within the docker directory, we will create a php directory and place a Dockerfile in it:
ARG DEBIAN_FRONTEND=noninteractive
RUN apt update \
&& apt install -y zlib1g-dev libzip-dev libpng-dev libmagickwand-dev libssl-dev pkg-config mariadb-client curl gnupg unzip\
&& docker-php-ext-install pdo_mysql zip gd \
&& php -r "readfile('http://getcomposer.org/installer');" | php -- --install-dir=/usr/bin/ --filename=composer \
&& pecl install redis \
&& docker-php-ext-enable redis \
&& pecl install mongodb \
&& docker-php-ext-enable mongodb \
&& pecl install imagick \
&& docker-php-ext-enable imagick \
&& mv "$PHP_INI_DIR/php.ini-development" "$PHP_INI_DIR/php.ini"
Nginx Config
Within the docker directory, we will create an nginx directory.
listen 80 default_server;
root /var/www/html/public;
index index.html index.htm index.php;
server_name _;
charset utf-8;
location / {
try_files $uri $uri/ /index.php$is_args$args;
}
location ~ \.php$ {
try_files $uri =404;
fastcgi_split_path_info ^(.+\.php)(/.+)$;
fastcgi_pass php:9000;
fastcgi_index index.php;
include fastcgi_params;
fastcgi_param SCRIPT_FILENAME $document_root$fastcgi_script_name;
fastcgi_param PATH_INFO $fastcgi_path_info;
}
error_page 404 /index.php;
}
These two configurations are defined in our docker-compose.yml file to further detail out how we want docker to create our container and services, including which php extensions we need.
Laravel Config
One thing that can be confusing is connecting to the central database from another container. You can no longer use 'localhost' or '127.0.0.1' to connect, because that request will look to the container it is coming from, not the centralized one we created (docker-common). What we will do instead is utilize our shared network with the docker-common container to call on the hostname of the mysql service we setup there (in this case, 'db'). Example below.
DB_HOST=db
DB_PORT=3306
DB_DATABASE=projectx
DB_USERNAME=dbuser
DB_PASSWORD=secret
Conclusion
That's it! Once you build and start the docker containers (I recommend installing / utilizing Docker Desktop), your site should be available at https://projectx.localhost! Have another project that needs to utilize that central database? Just follow the same steps as you did for Project X! The only other change you might need to make (depending on how you generated your SSL Certificate) is you might need a new SSL Certificate in the docker-common to cover the new project's domain.
Credit goes to Adam Dear for creating this structure in the first place, and allowing me to share it here.